Using the Eggplant DAI Runner
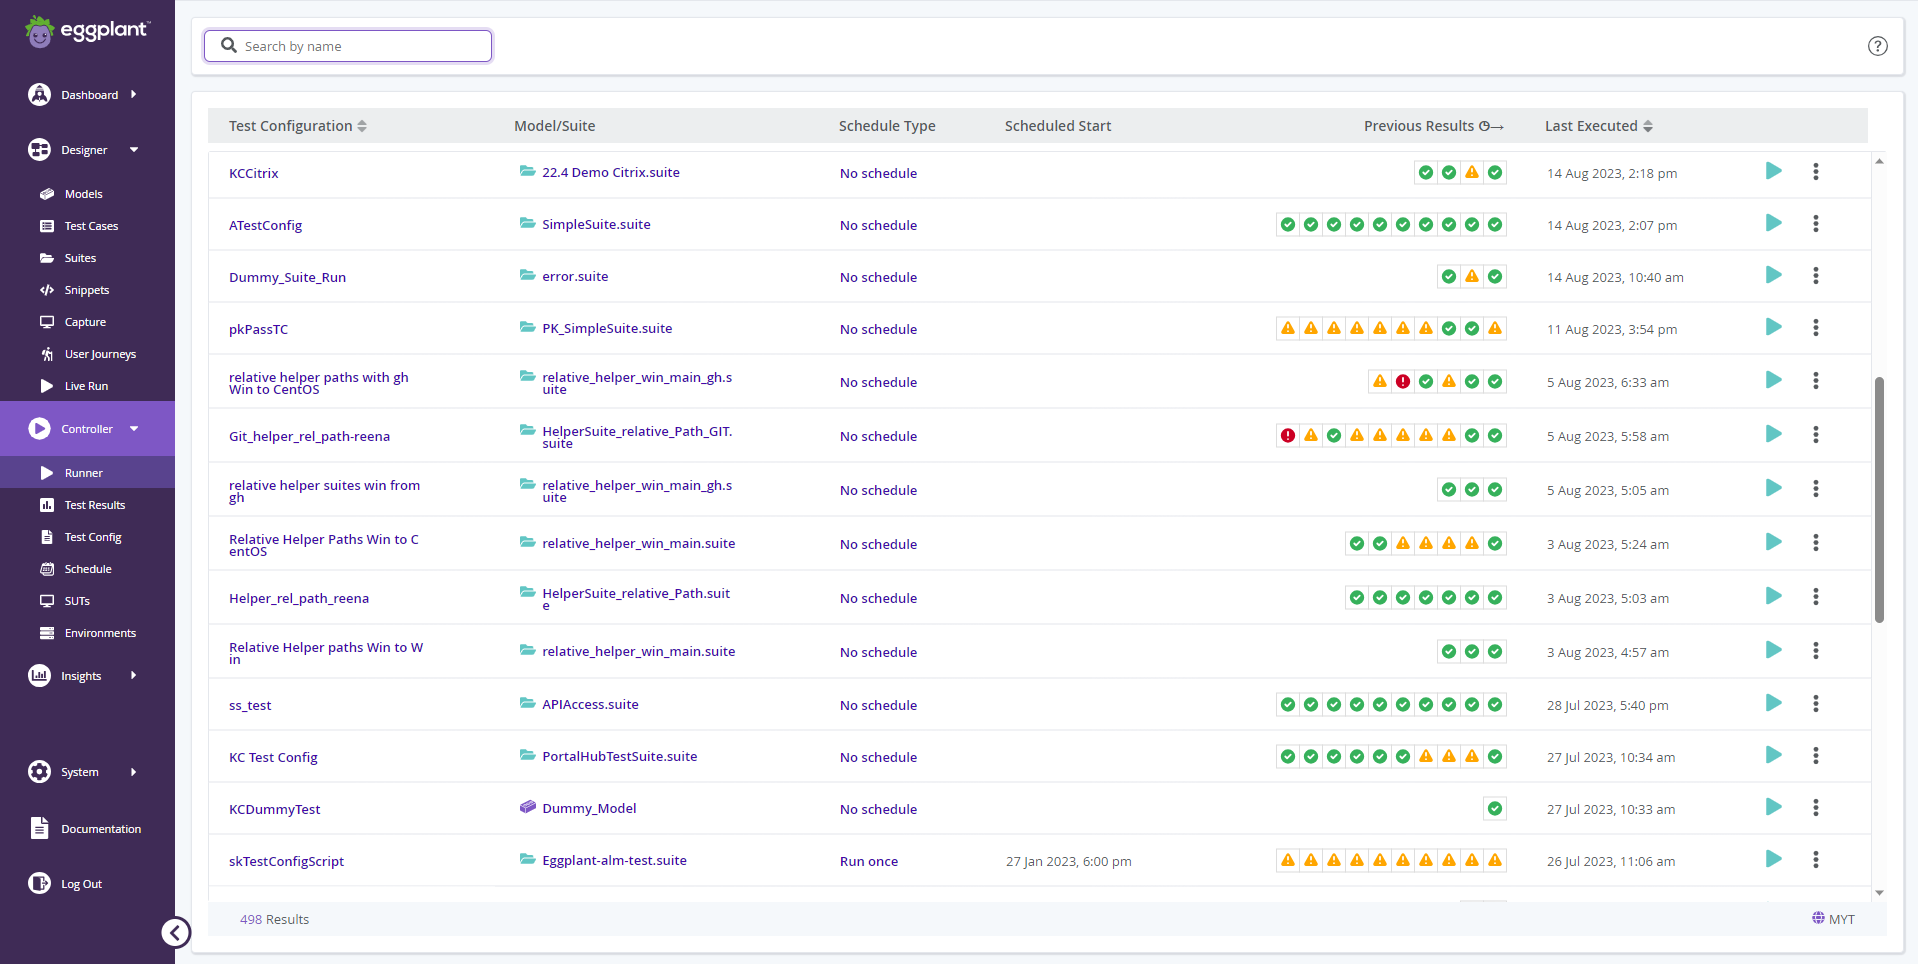
The Eggplant DAI Runner lets you run your pre-configured tests that were created in the Test Configuration tab and view the results of those tests via color coded dots. You can also schedule test runs from the Runner tab and see the tests that are in progress. To access the Runner tab, click Controller on the left menu of the Eggplant DAI interface.
Running Tests
To run a test, from the Runner tab, click the ![]() Run button against a test configuration that you want to run. Repeat this step if you need to run more tests.
Run button against a test configuration that you want to run. Repeat this step if you need to run more tests.
Remember to re-upload any scripts that you may have changed manually via Eggplant Functional or in the Eggplant DAI Snippet Editor back to the Execution Environment (Manage Agents > Manage Suites) before running the test, or your changes may be overwritten.
Note that when executed through a parent model, submodels will use the same suite as the parent model.
To stop a test configuration instance that's already in progress, click ![]() .
.
When you abort a test run that is part of a test configuration schedule, all runs that are part of that configuration schedule are aborted.
The Runner Interface displays the following information about your test configurations:
-
Test Configuration: The names of your test configurations. This column can be sorted alphabetically.
-
Model/Suite: A link to the Eggplant DAI model or suite used for the selected test configuration, each indicated by their respective icons to the left - where a building block
 represents a model and a folder
  represents suites.
 -
Schedule Type: The type of schedule for the test configuration. Displays No Schedule if none exists for a given test configuration.
-
Scheduled Start: The date and time that a scheduled test run will start for a given configuration. This field is blank if no schedule exists for that test configuration.
-
Previous Results: Shows the results of the ten most recent test executions (if applicable) represented via color-coded dots (described below). Hovering on an individual dot shows the status and date/time of the execution. Click to expand to see a snapshot of the results of that execution.
 Indicates that the test was successful.
 Indicates that the test has failed.
 Indicates that the test configuration is in progress.
 Indicates that the test resulted in error.
 Indicates that the test run was aborted.
See Viewing Execution Results for more information.
- Last Executed: The date and time of the most recent execution. Displays In Progress if a test execution is ongoing. This column can be sorted chronologically.
Viewing Execution Results
Accessing Detailed Test Execution Results
In the "Previous Results" column, you can gain insights into your test config execution by clicking on the individual run result icons. These icons represent various outcomes such as
![]() Pass,
Pass,
![]() Fail,
Fail,
![]() In progress,
In progress,
![]() Error or
Error or
![]() Canceled.
Clicking on them will expand a detailed summary of the test execution.
Canceled.
Clicking on them will expand a detailed summary of the test execution.
Test execution summary view Within this summary, you'll find following information:
- Execution result: This indicates whether the test was successful or encountered issues.
- Run details: Details such as when the execution started, its duration, and information about the System Under Test (SUT).
- Steps completed: The number of steps successfully executed.
- Total reruns completed: This includes the total number of reruns performed across all steps.
- Total test runs completed: This encompasses the overall test runs, which includes both initial runs and any reruns that were necessary.
Donut chart A donut chart provides a visual representation of your test configuration's results. The chart showcases the following:
- Passed first time: The number of test cases that passed on their initial attempt.
- Passed after rerun: Test cases that initially failed but ultimately passed after a rerun.
- Failed: Test cases that did not meet the success criteria.
- Errored: Test cases that encountered errors during execution.
- Cancelled: Test cases that were incomplete.
- In progress: Test cases that are currently running.
Please note that in cases involving multiple reruns, the donut chart will display only the final result of the rerun. To learn more about the re-run feature visit the following page: Test configuration
Test Configuration Logs For a more in-depth understanding of the testing process and detailed test case execution results, you can refer to the Test Configuration Logs. These logs provide a record of the testing and relevant details.
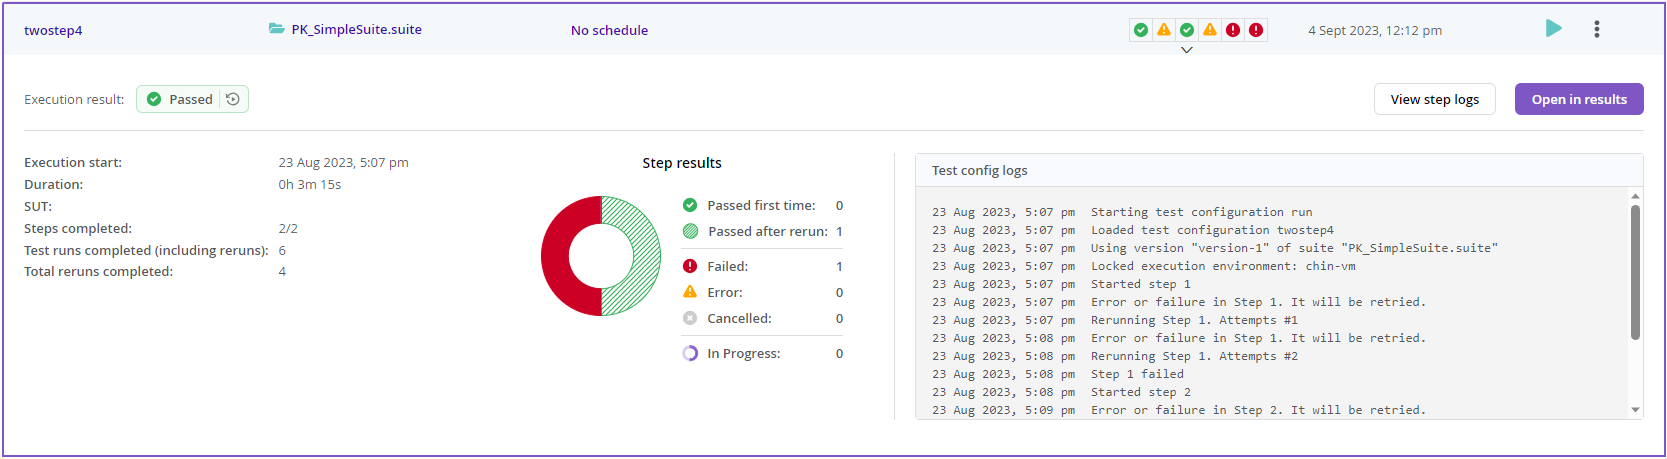
Click Open in results to drill down into the results of the selected test execution. This opens the Results tab showing all the individual test runs for the selected test execution, but you can switch to the default All Runs view by clicking View all results link at the top of the display. Note that the Open in results button is available for all test results except for the runs that went into Error state.
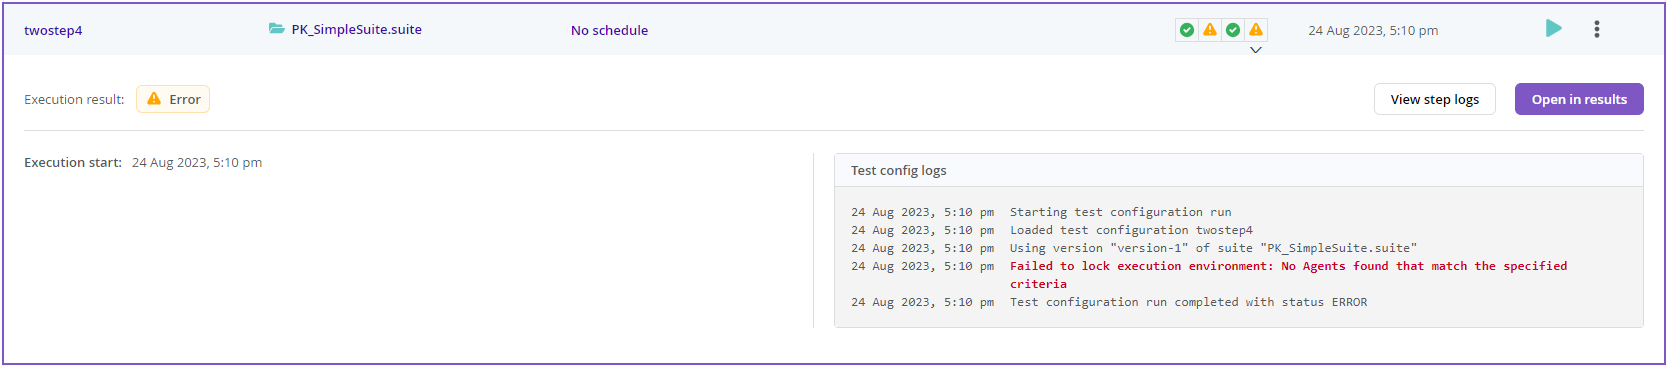
Clicking the ![]() Error execution dot shows the reason for the error in the expanded view:
Error execution dot shows the reason for the error in the expanded view:
Deleting a Test Runs from Runner
In the Previous Results column, click the individual color-coded dots representing ![]() Success,
Success,![]() Failure,
Failure, ![]() In Progress ,
In Progress , ![]() Error,
Error, ![]() Cancelled to view the summary of that test execution in an expanded view.
Cancelled to view the summary of that test execution in an expanded view.
In the expanded view, click Open in Results to further drill down into the results of the selected test execution. This opens the Test Results tab showing all the individual test runs for the selected test execution.
At the top right corner of the screen is a red button labeled as Delete Run. Clicking on it will render a confirmation box. Click on Confirm to proceed with the deletion.
The instance of the selected test execution as well as all of its results will then be deleted.
Once deletion is completed, the screen will redirect back to Runner tab.
Scheduling Test Runs
Scheduling test runs adds great flexibility to your test runs, i.e., you can set your tests to run at specific intervals in the frequency you require. You can execute a test configuration with or without a schedule in the Eggplant DAI Runner interface.
If a test execution is initiated (either at a scheduled time or by clicking the ![]() Run button) while another test execution for the same test configuration is in progress, then the newly-started test execution will immediately complete with an error.
Run button) while another test execution for the same test configuration is in progress, then the newly-started test execution will immediately complete with an error.
Step-by-Step: Scheduling Tests
-
You can schedule test runs in one of the two ways:
- In the Runner tab, click the Schedule Type capsule against the test configuration you want to create a schedule for.
- From the Actions menu
 , select Edit to open the schedule interface. The Edit test schedule calendar interface.
The Edit test schedule calendar interface opens.

-
Make the required changes in the calendar interface, e.g., choose a specific date and time for the test to execute and frequency by selecting from the following options:
- No Schedule: To run tests without a schedule.
- Run once at selected time: To run the test for the specified date and time.
- Run on selected then repeat every: To schedule the test to run periodically. You can customize your test to run at specific Minutes, Hours, Days of the Week, and Days of the Month.
-
Click Save to preserve your changes or Cancel to discard it.
Viewing All Runs
You can view all runs within a test configuration, including any executions that didn't go through, runs that are in progress, and typical runs with usual pass or fail status. Viewing all runs within a test configuration is particularly useful to locate the details to determine the likely cause of a failed run.
Viewing Run History
From the Actions menu ![]() , select View All against the test configuration you want to view the history of. The results open in a separate interface displaying the following information with most recent runs:
, select View All against the test configuration you want to view the history of. The results open in a separate interface displaying the following information with most recent runs:
- Execution Date: The date and time of the test configuration.
- Status: Shows the status of the test executions in color-coded capsule format. The options are:
- Success
- Failed
- In Progress
- Error
- Canceled
- Open in Results: Click Open in Results to further drill down into the results of the selected test execution. This opens the Results tab showing all the individual test runs for the selected test execution, but you can switch to the default All Test Runs view by clicking View all results.
- Expand row button: Click to view a snapshot of the results of the selected execution.
Click the Runner navigation link to switch back to the Runner tab.
Deleting Test Runs from Run History
Click Open in Results to further drill down into the results of the selected test execution. This opens the Results tab showing all the individual test runs for the selected test execution.
At the top right corner of the screen is a red button labeled as Delete Run. Clicking on it will render a confirmation box. Click on Confirm to proceed with the deletion.
The instance of the selected test execution as well as all of its results will then be deleted.
Once deletion is completed, the screen will redirect back to Run History tab.